Friday, July 27, 2012

Music For Kids - Part 3

Here is the third and last post about some of the music that we have discovered and introduced to the boys this past year.  Last fall our small group from church focused on how to guard a child's heart and mind while raising them in today's society.  We studied the book Guarding Your Child's Heart by Dr. Gary Smalley.  It explains how important Scripture memory and meditation is to our everyday life and encourages parents to get the Bible into your child's heart as early as possible.

One of the easiest things we have done to begin planting positive seeds into J and L is through music.  We found some really great music that the boys love and so do we!  Not nursery rhymes or the kind of songs that will drive you crazy after just a few seconds - really good modern music that makes Jesus and the Bible cool.  This week we are sharing music that your kids are sure to love.  We've introduced you to The Rizers and Go Fish - the last group we'll share for now is Hillsong Kids.

 
Hillsong Kids is the children's ministry of Hillsong Church, a global church that is one of the largest and most influential in the world.  Hillsong has two other worship ministries, Hillsong Live and Hillsong United, that write and release songs year after year that are used in churches around the world.  J and L love the music at church.  We pass our church on the way to and from preschool and every morning and afternoon they say they want to go to church!  This is an easy way to bring church home with us and have great music all week long.  Here are some of Hillsong Kids' releases:


Wednesday, July 25, 2012

Music For Kids - Part 2

Here is the second of a three-part post about some of the music that we have discovered and introduced to the boys this past year.  Last fall our small group from church focused on how to guard a child's heart and mind while raising them in today's society.  We studied the book Guarding Your Child's Heart by Dr. Gary Smalley.  It explains how important Scripture memory and meditation is to our everyday life and encourages parents to get the Bible into your child's heart as early as possible.

One of the easiest things we have done to begin planting positive seeds into J and L is through music.  We found some really great music that the boys love and so do we!  Not nursery rhymes or the kind of songs that will drive you crazy after just a few seconds - really good modern music that makes Jesus and the Bible cool.  This week we are sharing music that your kids are sure to love.  The last post introduced you to The Rizers, and today we want to share our newest discovery - Go Fish.


Their tagline is "great music for kids that won't drive their parents bonkers!"  Leaving a promising career in Christian pop music behind, they have been making music exclusively for kids since 2003.  Their new audience might be smaller in stature, but not in numbers. They found that good news—and good music—travels fast, especially with moms.  Go Fish's latest release, Kickin' It Old School, passes foundational songs down to the next generation.  Many of today's kids have never seen a hymnal, so this project was created to introduce them to these classic songs.  While the music is great, Go Fish also created Vacation Bible School curriculum to encourage kids to get into the Bible.  Here is a list of their releases:


These links are the for the audio CDs, but you can also listen to previews and download the MP3s at Amazon.

Monday, July 23, 2012

Music To Teach And Train Your Kids

Here is the first of a three-part post about some of the music that we have discovered and introduced to the boys this past year.  Last fall our small group from church focused on how to guard a child's heart and mind while raising them in today's society.  We studied the book Guarding Your Child's Heart by Dr. Gary Smalley.  It explains how important Scripture memory and meditation is to our everyday life and encourages parents to get the Bible into your child's heart as early as possible.

One of the easiest things we have done to begin planting positive seeds into J and L is through music.  We found some really great music that the boys love and so do we!  Not nursery rhymes or the kind of songs that will drive you crazy after just a few seconds - really good modern music that makes Jesus and the Bible cool.  This week we are sharing music that your kids are sure to love, and first up is The Rizers.


The mission of The Rizers (short for Memorizers) is to instill in kids a love for Jesus Christ and his Word through Scripture memory, praise and worship.  They have two great Scripture memory CDs - Meet The Rizers and Rise Up.  These links are the for the audio CDs, but you can also listen to previews and download the MP3s at Amazon.

Friday, July 20, 2012

Review: Nap Nanny


Our lifesaver with L. I remember looking at parenting magazines before the twins were born and seeing this thing called the Nap Nanny. I thought it was neat and I checked out the website. I liked it but thought it was a little expensive. Flash forward a couple months and I had two premature boys that both liked to reflux and spit up. J only did it a little bit but L was a puker. He spent a lot of time on a hospital reflux wedge and still puked. I was sitting there one day in the NICU doing skin-to-skin with L and flipping through a magazine and saw another add for the Nap Nanny. I wanted it! I put it on our (and the boys) Christmas list and luckily some of my hubby's family pitched in and got us one. Once L came home he spent many hours on the reflux wedge until he outgrew it and then we started putting him on the Nap Nanny. He stayed in it until he was almost 2. The only reason he stopped sleeping in it was he was too active and he kept crawling out of it. The night he crawled out and pulled his feeding tube out of his belly was his last night! He still uses it when he is sick to lay in the living room and watch TV. J even likes to lay in it when he is sick too. This product was well worth every penny we didn't pay for it and would recommend it to anybody that has a baby! It is great for the severe refluxers like L but also for babies with colds or just a little reflux. We all hear stories about the babies that can only sleep in their car seat or baby swing...this is the perfect option for a comfortable and safe inclined sleeper.

 L watching tv while getting a tube feed. We had a system of layering blankets over the Nap Nanny since we had many episodes of throwing up a day and an occasional diaper blow out. When a blanket would get dirty we would just peel it off and there was a clean one under it. This helped us from having to wash our Nap Nanny every day several times! You can also buy extra covers for them which is what we should have done but our sleep deprived minds didn't even think about that!
 We would take the Nap Nanny to the hospital with us because it make L feel more secure and rest easier. It was something familiar from home. This picture was from a 10 day pneumonia stay and he was on the mend-note toy in mouth!
 The cover has a zipper on the bottom to take it off and on the foam piece. There are also D-rings that help secure the cover to the foam. This is from the first generation when the lap belt was just attached to the cover. The newer generation of Nap Nanny's lap belts are more secure and actually attach to the foam.
Another great thing that helped us was they made a travel cover for it so it helped us keep it clean and prevented any damage!

 One thing to note is the Nap Nanny is to only be used on the floor-Never in a crib or elevated surface. L didn't sleep in his crib until he was almost 2! This is one of the reasons....escape artists! They can climb out and then get stuck and then be in a dangerous situation. As L got older he became pretty good at escaping the Nap Nanny.

So bottom line: BUY IT! We would have paid for 20 of them if needed......


Wednesday, July 18, 2012

Pot Roast


Ken jokes that every time we have friends or family over I use them as guinea pigs! It always gives me a reason to cook and try new things. We love the crock pot for Saturday nights so food is ready for us when we get home from church. This is something I got off Pinterest. I would usually post the original link but this one was just a link to a picture and a recipe in the comments area. The roast turned out fantastic and this is going in the KEEP bin!

One pack each: Ranch Dressing Pack, Italian Dressing Pack, Brown Gravy Pack

Mix with 1/2 cup water and then pour over the roast. I didn't turn it or touch it in any way while it was cooking. Right before we left for church I added a couple cans of green beans, fresh carrots, and potatoes. Everything was perfect when we got home! We just started to use the temp probe feature on our crock pot and it works so much better than just the standard high/low setting. Try it! It is super yummy! Enjoy.

Monday, July 16, 2012

L's current backpack


After scouring the Internet for different kinds of feeding tube backpacks we quickly found that there aren't many out there. I talked about the Super Mini Backpack and The Feeding Essential Kiwi backpack and there are only one or two other backpacks out there for small kids. So Ken and I decided to try our hand at making a backpack for L. We bought an Elmo backpack at Wal-Mart that was really small but quickly decided that is wasn't going to work for a feeding tube backpack. The straps weren't padded and didn't get tight enough so he could quickly slip out of it. The back material was not really strong enough to hold the weight of the feeding tube and bag either. After searching Amazon and researching backpacks we decided to get a Littlelife Runabout Toddler Daypack. It was small, had a chest strap, padded shoulder straps, is super cute and is just the right price! It was $28, so compared to the $80 we paid for the Super Mini Backpack it was a steal. Thanks to my mom for helping us make this backpack into a feeding tube backpack. She did all of the sewing and work...we just told her what we wanted and she made it happen. Here is what we did:


1. We had some Toy Story ribbon that we had bought on clearance from a previous (failed!) project that we used to tie the bag. We doubled the ribbon to make it more sturdy and then put it at the top so the feeding bag would hang above the pump. I wanted it long enough to tie a bow but Hubby thinks it is too long...It is a perfect length! I decided I wanted to do ribbon instead of velcro because I think it will last longer than velcro. The super mini backpack's velcro doesn't stick anymore and pretty much after 10 minutes the feeding bag has fallen down. 


2. My mom did an extra big button hole on the back of the backpack on the left side. The fabric was a little hard to get a nice clean button hole but it works and doesn't really get seen! 

One thing to note is we ordered the blue backpack with the dinosaur on it and got this one instead so just beware you might not get a dino backpack. The hedgehog is cute though!


That is all we had to do! There was another backpack that I thought about getting but it didn't have a chest strap already so the Littlelife backpack won. It wouldn't be hard to add a chest strap to a backpack but for our first time we wanted to make it as simple as possible. The backpack is really small so figuring out how to get the pump and bag and emergency supplies in it took a couple of days to figure out. The supplies sit in the bottom of the bag, the pump sits vertical with the side where the tubes come out at the bottom, and the bag hangs from the ribbon. The weight distribution is similar to the super mini backpack, so it was an easy transition for L to make. We (I and the teachers and the therapist--Hubby is still unsure) actually like this backpack the best out of all of them because it fits him so well. It isn't bulky, sits perfect on his back, and is even a little more compact than the super mini backpack. L has a favorite rocking chair at home that he couldn't sit in when he wore his super mini but he can sit and be comfortable in it with the Littlelife backpack. It is also easier to cuddle with him with the Littlelife backpack!


 The chest strap fits him perfect! The super mini backpack "chest strap" was very low and always bothered his GJ tube.

Thursday, July 12, 2012

Review: Feeding Essentials Kiwi Backpack

feeding tube backpack, super mini backpack, feeding essentials backpack, strap pals, chest strap, infinity, Kiwi backpack, zevex infinity enteral feeding pump  , EnteraLite, failure to thrive, feeding tube, G tube, G/J tube, mic-key, special needs, tubie

I had been following this company's Facebook page for a while. They are cheaper than the super mini backpacks and a lot cuter. When a mom was selling her gently used Kiwi backpack we decided to buy it and give it a try. It was a cute navy backpack with robots on it. It came with the optional matching padded shoulder straps too. We tried it on L a couple times and here is what I think:

1. The quality of fabric and the durability of the backpacks are great. I don't know how long the previous mom used the backpack..there was significant fading and some wear spots...but the seams and all stitching was still strong and intact. This company knows how to make a durable pack. GREAT!

2. The additional padded shoulder straps were nice. They added a little comfort to the straps for L when his feeding bag was full of formula. GOOD!

feeding tube backpack, super mini backpack, feeding essentials backpack, strap pals, chest strap, infinity, Kiwi backpack, zevex infinity enteral feeding pump  , EnteraLite, failure to thrive, feeding tube, G tube, G/J tube, mic-key, special needs, tubiefeeding tube backpack, super mini backpack, feeding essentials backpack, strap pals, chest strap, infinity, Kiwi backpack, zevex infinity enteral feeding pump  , EnteraLite, failure to thrive, feeding tube, G tube, G/J tube, mic-key, special needs, tubie


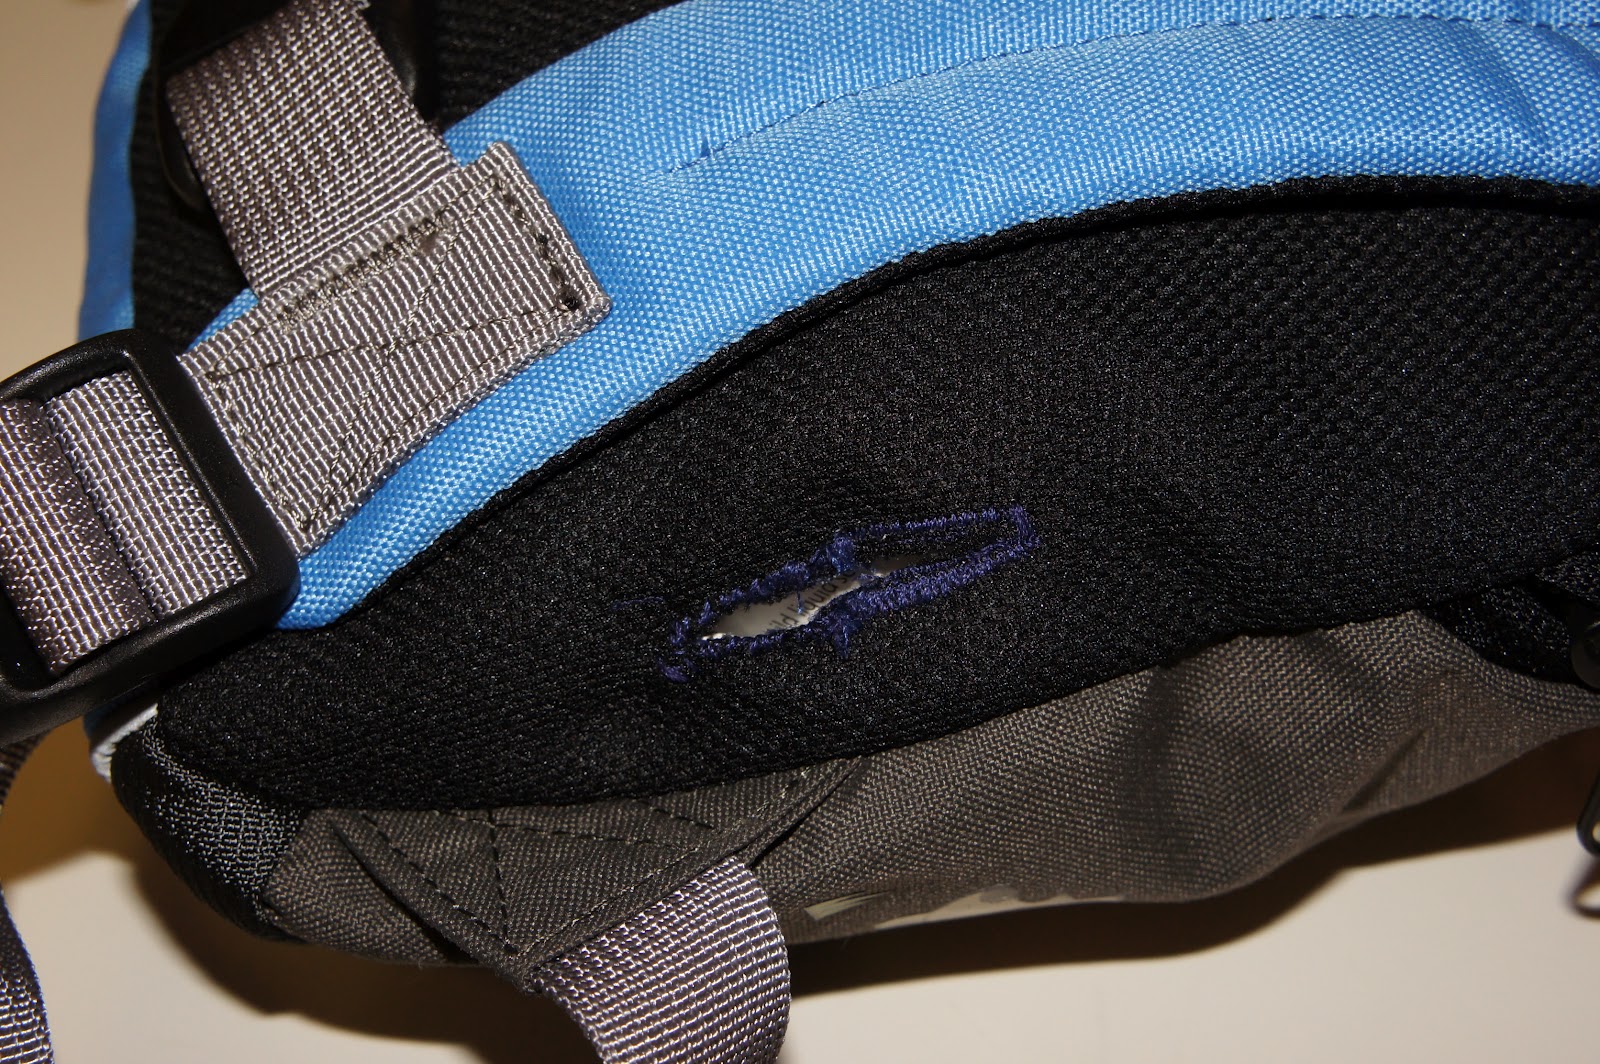
3. This backpack also came with the additional chest straps. Here is where I get to some of the negatives of the Kiwi backpack FOR US. There are many people who love them for their child but it wasn't for L. The straps fit him good but without the strap pals (padded straps) the straps tended to dig into L's neck and shoulders especially first thing in the morning when his bag was heaviest. The additional chest strap was great to help us keep the backpack on L but it wasn't fixed to a certain site and would slide up and down the straps. We could never get it to stay where we wanted it too even after multiple strap adjustments. Another negative to the chest strap was that it bunched/wrinkled the shoulder straps and the shoulder straps wouldn't lay flat. I did some google searches and a majority of the pictures of other kids wearing the Kiwi backpack have the same issue. L was always pulling at the straps to try to make it feel better and would get frustrated with it. NOT SO GOOD!

feeding tube backpack, super mini backpack, feeding essentials backpack, strap pals, chest strap, infinity, Kiwi backpack, zevex infinity enteral feeding pump  , EnteraLite, failure to thrive, feeding tube, G tube, G/J tube, mic-key, special needs, tubie
 Notice how the straps wrinkle at the site where the chest strap are located. No matter how we adjusted we could never get them to lay flat. Maybe if they were sewn and in a fixed location.....


4. The size of the backpack is great. It is small and thin and easy for little kids to wear. The pump sits in the top zipper pouch and the feeding bag sits below it in the Velcro pocket. The only problem with the size was that there wasn't enough room to put our emergency supply bag in it like we could in the super mini.  There is a little pocket to put stuff in but it was too small and easy for little hands (Like L's twin brother J) to get into. The weight distribution was an issue for L. He is used to the majority of the weight being lower in the bag and he could never got used to it sitting higher. He would try to lean over to pick something up and the backpack would slide up, hit him in the head, and make him fall over. L never really complains about wearing his backpack but usually after 45min of wearing this backpack he would ask for it to be taken off and if you said no he would try to take it off himself.   
Actual Size: GOOD        
Weight Distribution: Not for L        
 Extra Storage Site/Size: BAD

feeding tube backpack, super mini backpack, feeding essentials backpack, strap pals, chest strap, infinity, Kiwi backpack, zevex infinity enteral feeding pump  , EnteraLite, failure to thrive, feeding tube, G tube, G/J tube, mic-key, special needs, tubie
 Top flap open to reveal the plastic sheet that allows for pump screen and buttons to be seen. That compartment is accessible through the top zipper.
feeding tube backpack, super mini backpack, feeding essentials backpack, strap pals, chest strap, infinity, Kiwi backpack, zevex infinity enteral feeding pump  , EnteraLite, failure to thrive, feeding tube, G tube, G/J tube, mic-key, special needs, tubie
 The storage area is between the robot fabric and the fabric that covers the feeding bag compartment. Not much room to put our supplies and since it is on top it is easy for curious brother to get into. Also there isn't extra room inside the feeding bag area to put supplies.
feeding tube backpack, super mini backpack, feeding essentials backpack, strap pals, chest strap, infinity, Kiwi backpack, zevex infinity enteral feeding pump  , EnteraLite, failure to thrive, feeding tube, G tube, G/J tube, mic-key, special needs, tubie
 This is the opening to the area that the feeding bag goes into. It is hard to get the bag into and also the Velcro piece to hold the bag on is very short. It is good quality Velcro that still holds strong even with a overfilled 500ml bag! One thing that I didn't talk about was that getting the tubing to the feeding pump and making sure it wasn't kinked was a hassle too.
feeding tube backpack, super mini backpack, feeding essentials backpack, strap pals, chest strap, infinity, Kiwi backpack, zevex infinity enteral feeding pump  , EnteraLite, failure to thrive, feeding tube, G tube, G/J tube, mic-key, special needs, tubie
 My hand is the the area that the feeding pump goes. Sorry I didn't use the pump but it was busy feeding a little boy! The top of the bag has a zipper opening for the pump and the clear plastic piece to see the pump.


 For us it wasn't the best pick for L so back to the drawing board we went. We keep it around because you never know when you will need an extra backpack and it is acceptable for an emergency backup backpack! I think if we had started with this backpack that L might not have had issues with it but since he was used to different straps and where the weight sits he didn't like it. Check out the site. There are more features and helpful AND cute products I didn't talk about but it is a company worth supporting!

Here is their website and a link to videos on Facebook showing how to use/load the backpack:
http://www.feedingessentials.com/
http://www.facebook.com/photo.php?v=501840457096


Wednesday, July 4, 2012

New and improved potty seat

The boys are coming along with the potty training. J is wearing pull-ups all day long and is getting better at letting us know when he needs to go. L is getting better too and will usually follow brother into the bathroom and go or at least try. L usually uses the frog potty seat that sits on the floor, and J usually will sit on his Sesame Street Elmo potty seat that is on the toilet in their bathroom.

We bought the Elmo seat at a consignment sale and the boys love it, but it did not come with a splash guard. We soon discovered that the splash guard was a critical part of the seat and would make things much easier for all of us. I looked on Amazon.com and found a Disney Cars potty seat with an over-sized splash guard for less than $11.00. It arrived today and was simple to assemble. The price was great and the splash guard will make potty and cleanup time so much easier!

Here's what J has been using

New and improved seat with much bigger splash guard

Monday, July 2, 2012

Oriental Salad with Ramen Noodles

I love this "salad" and it is a very popular potluck item. I made this several weeks ago for book club and have been craving it every since. Yes I love to read and love my book clubbers! I work nights and don't always feel great and finding foods that settle well with the stomach are very limited. I was working Wednesday night and thought about making this and my mouth started watering. I sent hubby to the grocery store while I slept and when I got up I made this salad for dinner. It is super easy and delicious and it lasted 4 days of eating it two times a day. I love to cook and very rarely follow a recipe. I love to make it my own and add my own preferences. I am posting the original recipe and will tell you how I changed it.

Oriental Salad with Ramen Noodles
1 bag of cole slaw
1 bag of broccoli slaw (I don't like cole slaw so I do two bags of broccoli slaw)
1 pkg. Oriental Ramen noodles (I like 2 packs)
1 small bag of slivered almonds
cashews or peanuts (optional) (NOPE)


Dressing
1/2 cup canola oil (I use lighter flavor olive oil)
1/2 cup sugar *see note at bottom
1/4 cup cider vinegar
2 TBS. soy sauce
Season packet from the Ramen noodles
Preheat oven to 300-degrees. Line a cookie sheet with foil to save on clean up and spread out the almonds and crushed uncooked Ramen noodles. Bake the noodles and almonds for 12 minutes until they are a golden color. Let them cool.

Place both bags of broccoli slaw into a bowl. I go ahead and add the toasted Ramen and almonds as I don't really care if the noodles get soft. If you are taking this to a potluck don't add them until right before serving. Now to mix up the yummy dressing! 

I put everything into a Ziplock twist top container so it is easy to shake. Add the oil, sugar, cider vinegar, soy sauce, and the season packs. Put lid on tight and shake really well so everything mixes evenly. Pour and toss. I would do the dressing a couple hours before so the dressing can soften the broccoli some. I make a double batch of the dressing. The noodles and broccoli will absorb a lot and I like my salad dripping! I added boiled and chopped chicken into the salad this week so it was a complete meal for me.  

**I try to watch the sugar intake (even though you can't tell by my chocolate cake recipe) so when I made it this week I tried making it with Splenda. Spenda isn't my favorite sweetener but it is the best for cooking/baking. Sweet'N Low is my favorite for drinks. Anyways, I made it with Splenda (about 4 big spoonfuls) and it was okay but was better after adding 2 spoonfuls of sugar. So all in all I cut the sugar down from 1 cup (for the double batch) to 2 spoonfuls! I am happy with that.

*Also..sorry for the dark pictures. I am still working on getting the lighting and camera setting just right! Still needs some work....